Autopilot Classic
You are here. Triggers after each call/email to analyze its content in
real-time.
Retropilot
Triggers on a Salesforce event and analyzes all historical conversations.
Autopilot Batch
Triggers manually to run on a large set of records that match your defined
criteria.
Setting Up Autopilot Classic
This guide provides step-by-step instructions for configuring Momentum’s classic Autopilot feature to automatically extract and update Salesforce data from your sales calls.How Autopilot Works
Autopilot triggers after a single call or email, analyzes its content, and updates a Salesforce field.Prerequisites
Before configuring Autopilot, ensure you have:- Momentum AI installed with your preferred call provider
- Admin access to your Momentum Organization
- Salesforce integration active
- AI license seats assigned to team members
Step-by-Step Configuration
Step 1: Access the Autopilot Section
- Log in to your Momentum admin dashboard
- Navigate to the Autopilot section in the left sidebar
- Click “New Autopilot Extraction” to begin the setup process
Step 2: Select Salesforce Object and Field
Choose the Target Object:- Opportunity: Extract data to Opportunity fields
- Account: Extract data to Account fields
- Lead: Extract data to Lead fields
- Event: Extract data to Event fields
- Contact: Extract data to Contact fields. Momentum monitors self-referential statements from call participants and uses that context to inform CRM field extraction for each individual Contact.
- Custom Objects: Extract to other object fields by navigating from one of the default objects above
- Standard Fields: Choose from standard Salesforce fields
- Custom Fields: Select custom fields you’ve created
- Picklist Fields: Automatically limit outputs for fields with predefined values
- Text Fields: Automatically limit outputs for free-form text fields and their max length and formatting
- Number Fields: Automatically limit outputs for numeric data
- Boolean Fields: Automatically limit outputs for yes/no answers
- Lookup Fields: For lookup fields pointing to Contacts, Autopilot can suggest one of the external attendees from the call as the value (e.g., for “Primary Contact” or “Decision Maker” fields)
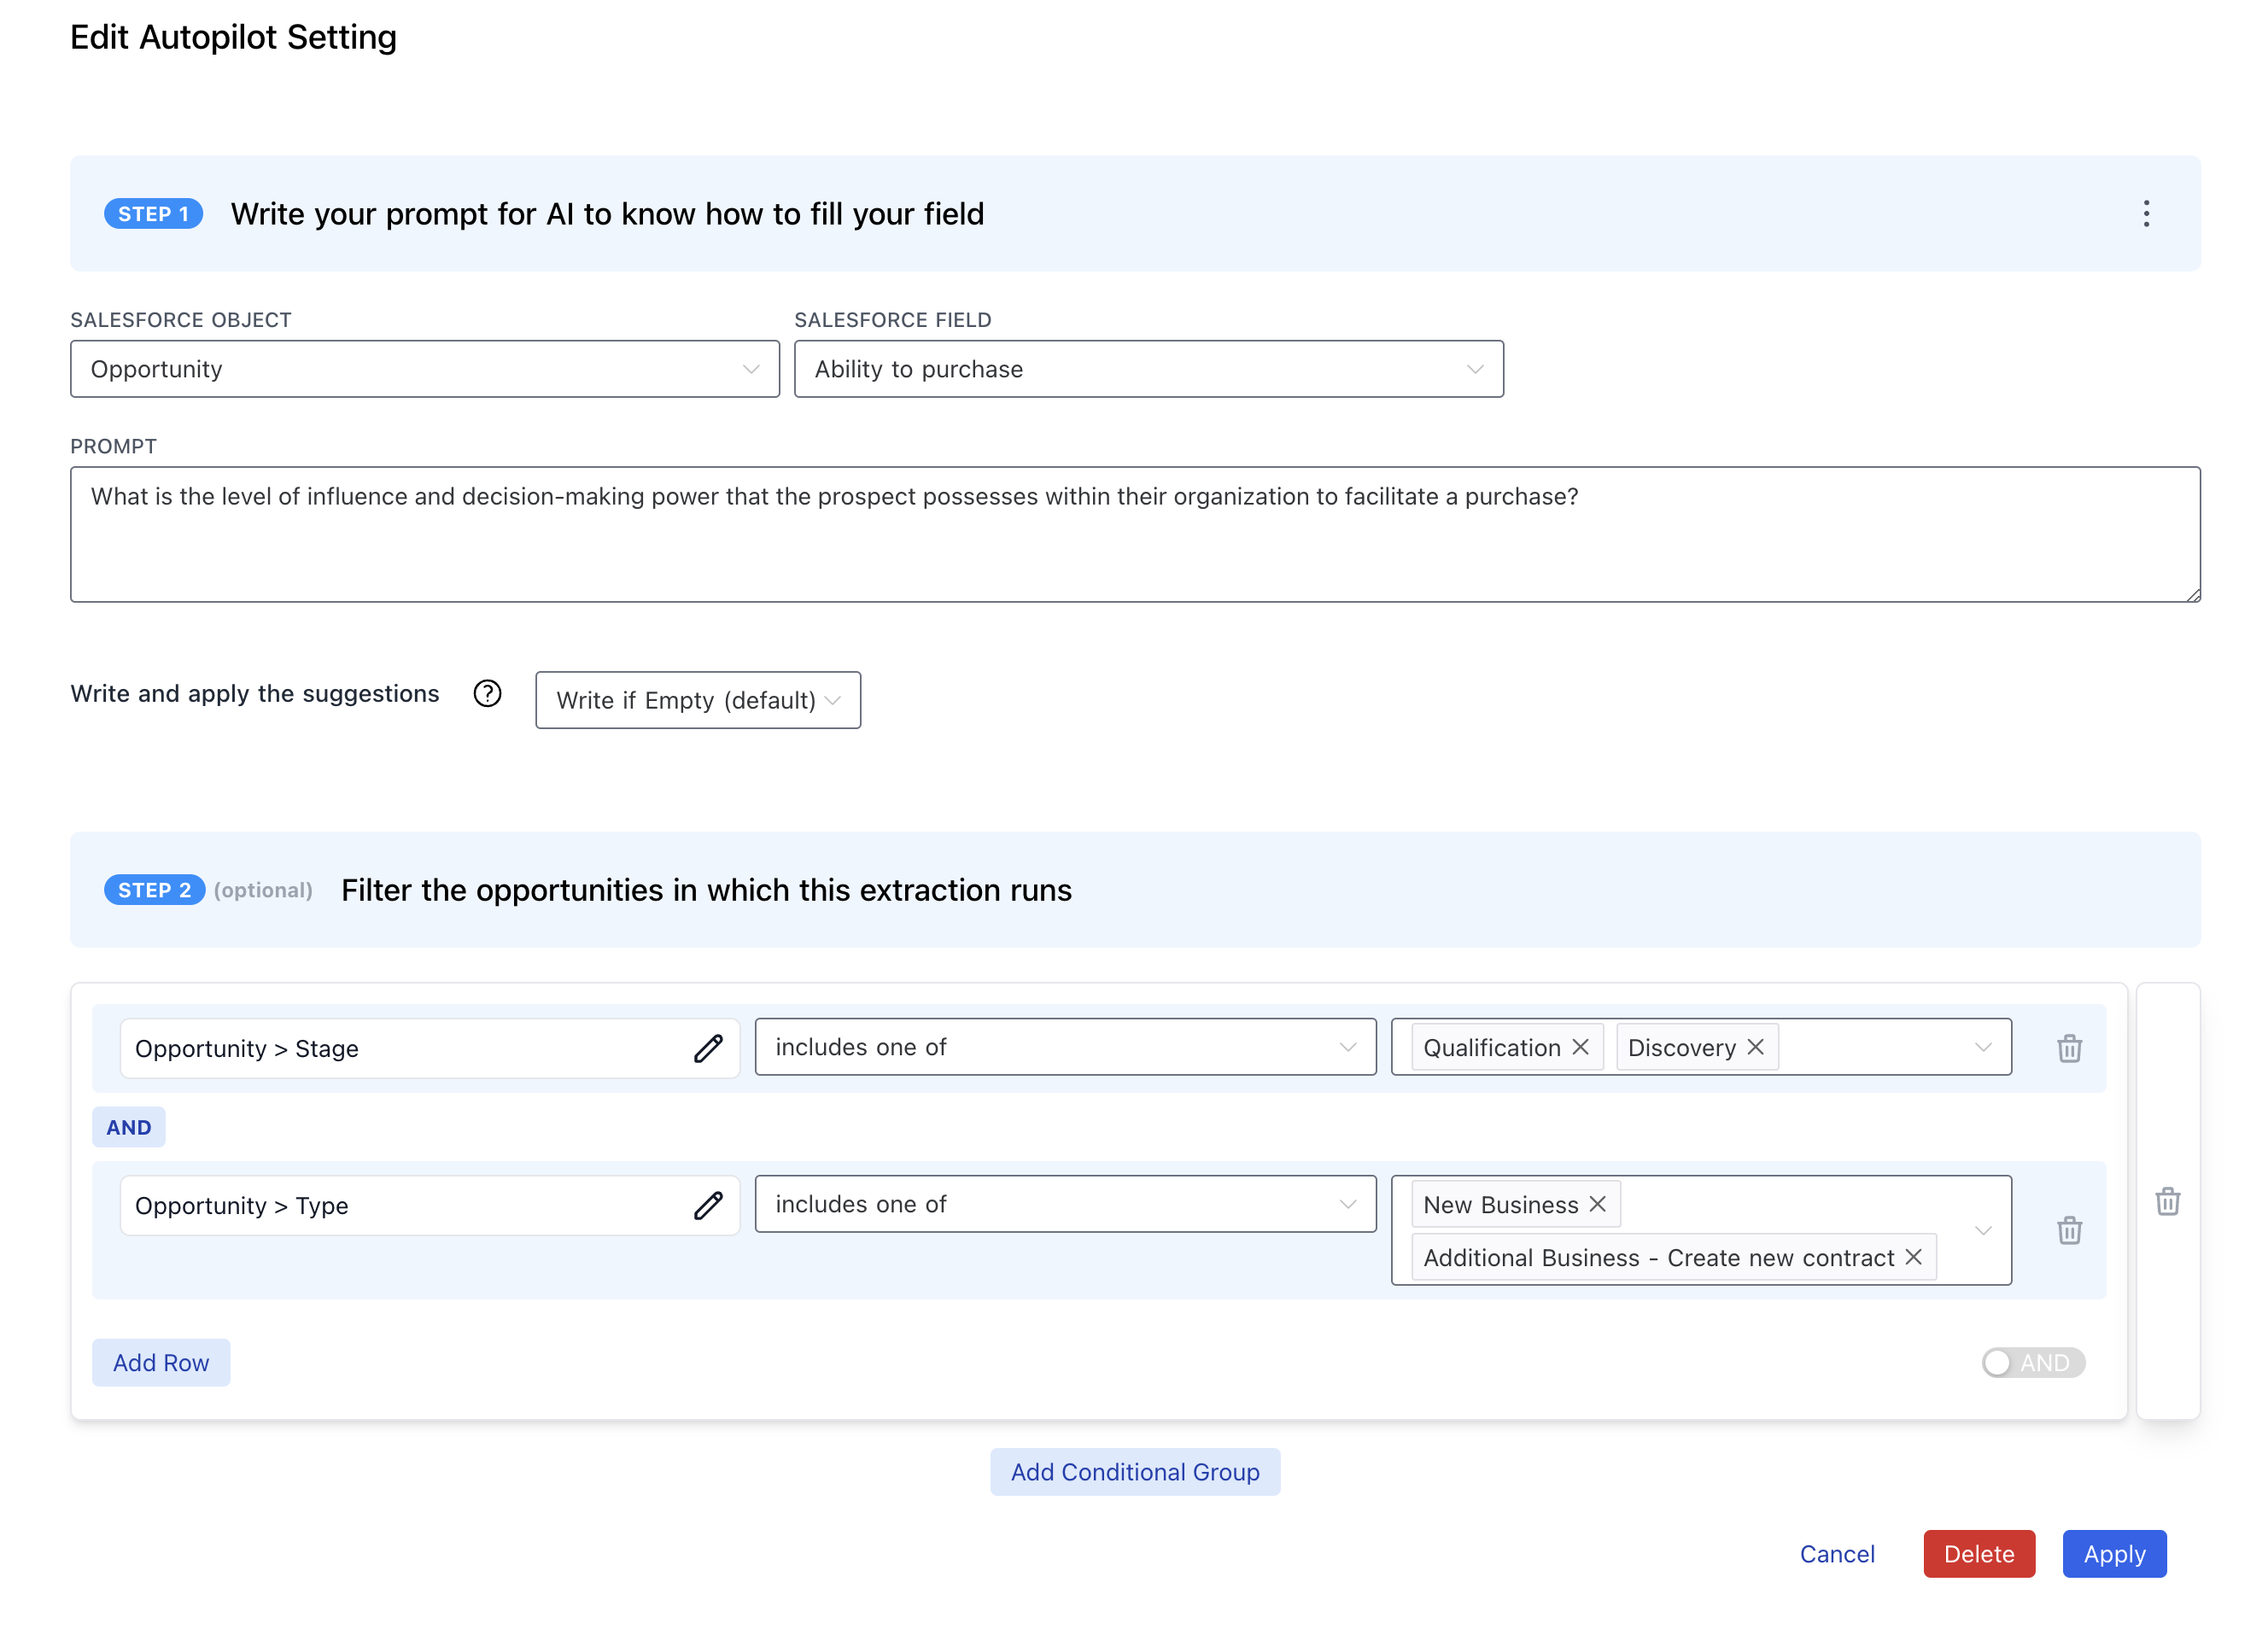
Step 3: Write Your AI Prompt
The AI prompt is the instruction that tells Momentum what data to extract from calls. Prompt Best Practices:- Be Specific: Clearly define what information you want extracted
- Use Questions: Frame prompts as questions the AI should answer
- Include Context: Reference the field name and expected format
- Set Boundaries: Define what should and shouldn’t be included
Step 4: Configure Conditions
Set conditions to determine when this extraction should run. You can use Salesforce field conditions, Smart Tag conditions, or both.Salesforce Field Conditions
Filter extractions based on CRM data like opportunity stage, account attributes, or custom fields. Example Conditions:Smart Tag Conditions (Optional)
In addition to Salesforce field conditions, you can use Smart Tags to trigger extractions based on what was actually said during the call. This ensures your automations only run when specific topics, keywords, or themes are detected. Example Smart Tag Conditions:- Competitive intelligence: Only run a competitive analysis extraction when a specific competitor is mentioned
- Objection handling: Trigger follow-up workflows when pricing or security objections are detected
- Feature requests: Route product feedback extractions only when feature requests are identified
Smart Tag conditions evaluate the tags detected on the current call. Make sure your Smart Tags are configured in Admin > Smart Tags before using them as Autopilot conditions.
Step 5: Configure Save Behavior
Choose how the extracted data should be saved to Salesforce. Save Options:- Confirm to Write: Show extraction in Slack or web app for manual review before saving
- Write if Empty: Only save if the field is currently empty, confirm to write otherwise
- Automatic Write: Automatically save all extractions if new data is identified
Autopilot automatically truncates extracted values to fit the target field’s
maximum length in Salesforce.
Step 6: Test Your Extraction
- Preview Your Extraction: Click the “Preview” button before creating to test your prompt against past calls
- Review Sample Results: Examine how your prompt performs on historical call data without affecting Salesforce or Slack
- Refine the Prompt: Adjust the AI prompt based on preview results
- Create Live Extraction: Once satisfied with preview results, create the extraction for production use
Advanced Configuration
Multiple Extractions for the Same Field
You can create multiple extractions for the same field with different conditions: Discovery Extraction:- Field: Pain_Points__c
- Conditions: Opportunity Stage = “Discovery”
- Prompt: Focus on initial pain point discovery
- Field: Pain_Points__c
- Conditions: Opportunity Stage = “Qualification”
- Prompt: Focus on validated and prioritized pain points
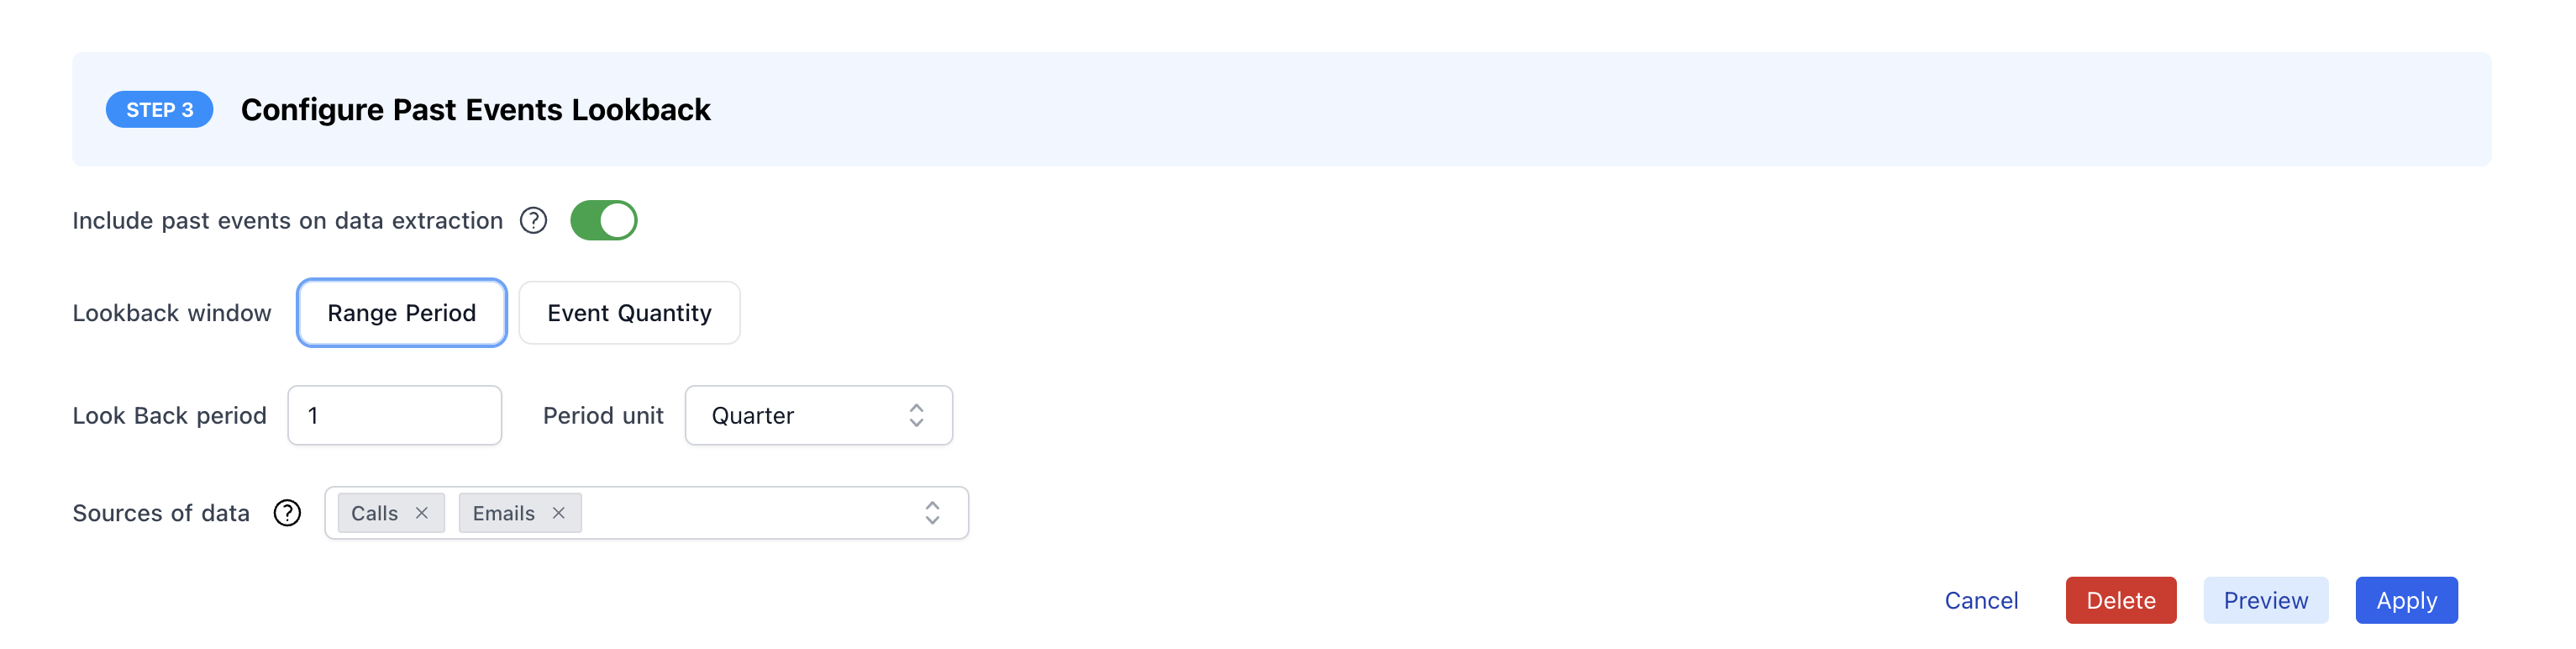
Include Historical Context with Lookback
Autopilot Classic normally references only the incoming call, but Lookback gives the AI access to historical interactions so it can factor in prior conversations. Configuration Modes:- Range Period: Define a timeframe (e.g., last week, last 90 days, last quarter). Momentum pulls in relevant calls, emails, and texts from that window.
- Event Quantity: Specify an exact number of recent interactions to include (e.g., last 10 touchpoints) regardless of when they happened.
- Choose any combination of calls, emails, or SMS/text messages.
Lookback is currently not configurable with Contact field extractions.
Context-Aware Extractions
Configure extractions that adapt based on call context: Stage-Based Prompts:- Use different prompts for different opportunity stages
- Adjust extraction sensitivity based on deal maturity
- Include stage-specific context in prompts
- Different extractions for enterprise vs. SMB accounts
- Industry-specific prompts and conditions
- ARR-based extraction rules
Best Practices
Prompt Engineering
- Start Simple: Begin with basic prompts and add complexity
- Test Iteratively: Refine prompts based on actual call data
- Use Examples: Include examples in prompts when possible
- Be Specific: Avoid vague language that could lead to inconsistent results
- Consider Context: Account for different call types and stages
Field Selection
- Prioritize High-Value Fields: Focus on fields that impact forecasting and reporting
- Consider Data Quality: Choose fields where manual entry is error-prone
- Start with Text Fields: Text fields are easier to configure than picklists
- Validate Picklist Mappings: Thoroughly test picklist field extractions
Troubleshooting
Common Issues
Extractions Not Running:- Check Salesforce conditions are correctly configured
- Verify calls are being recorded and processed
- Ensure AI license seats are properly assigned
- Review and refine AI prompts
- Check that the right calls are being processed
- Validate field mappings and conditions
- Improve prompt specificity and clarity
- Add examples to prompts for better guidance
- Consider using “Confirm to Write” for manual review
- Review extraction logs for patterns
- Refine prompts based on error analysis
- Consider breaking complex extractions into simpler ones
Support
If you encounter issues during configuration, contact our support team:- Slack: Use your shared Momentum channel
- Email: support@momentum.io